Sunday, December 6, 2009

Hackintosh – Again!

Well, it’s been a while and I thought it was time to start a new project. I still have some work to do to finish up my iPod dock / antique radio project, but I have been inspired by my latest purchase, so it will have to wait.

While looking around at an asset disposal sale at work I saw something that instantly looked like another project waiting to happen. I found a Blue and White Power Mac G3 tower. It was only $10 so I couldn’t resist.

This model came out in ’99 and was amazing at the time. All though I did read that there were some hardware problems in the initial release. But my plan is not to resurrect a 10-year-old, 300MHz computer. My plan is to rip out the existing hardware and build a Hacintosh into the beautiful looking case.

As you can see, Apple put a great deal of thought into the design, as they always seem to do. The side opens with little effort, and requires no tools to get right inside. It’s a very sharp looking design, and it would be a shame to let it go to waste.

I am just getting started with this project, but I will post an update as soon as I gather some hardware together.

Saturday, August 29, 2009

Mac Mini Media Centre

This week I want to tell you about my latest project - setting up a home media centre using a Mac Mini. Last week I got my new MacBook Pro, so my mini really wasn't needed any longer as my everyday computer. I thought this was the perfect opportunity to finally build a media centre computer.


I have tried several times in the past, but did not ever find a system that worked really well for me, and didn't require a great deal of computer know-how to use, after all my wife would need to be able to use it when I wasn't around. I tried Geexbox a while back. This is a Linux based live distro that works with a lot of different hardware - except the actual hardware I had available to me at the time. I was a student then and really could not afford to just go out and buy the supported parts to get this system up and working properly. I was working from spare parts and computers that I used to regularly scavenge from the side of the road on garbage night.


My last experience with a media centre was a birthday present from my wife. A D-Link DSM-320. This was a neat device that just plugs into your TV and can wirelessly stream music, video and photo's from your PC. The only problem was, this thing was VERY picky. I spent a great deal of time trans-coding video to even get it to work, and most times it would end up out of sync with the audio or the video would stutter. I did have a little more luck once I stopped using the bundled D-Link software and switched to Tversity, but it still wasn't what I was looking for. It was truly a lesson in frustration. I still have it, but I never use it.


Enter my Mac Mini. This little computer is really a perfect solution for a media centre. It's diminutive size and simple design allow it to easily fit into a home theater system. The setup was very easy, but did require a little research. First of all, my nice big TV does not have any digital inputs. I purchased it just before every TV came with digital inputs as standard. I have component, s-video, and composite inputs, and thats all. I also purchased my Mac Mini before Apple switched to the Nvidia video card. So I'm working with somewhat older hardware, but that doesn't mean I still can't enjoy a home media centre.


Getting Started

The first thing I did was erase the Mini and re-install OS X. This would give me a clean slate to start with. The first thing you will notice when you turn on a Mini with no keyboard and mouse is that it immediately starts looking for bluetooth devices. So I turned off bluetooth from the Systems Preferences. This stopped the annoying system hang when it first boots up.


I then needed to find a way to connect my Mini to my TV. I found a cable on the apple website that would plug into my DVI output of my Mini and switch the signal to s-video and composite. Not HD by any means, but definitely still watchable using s-video.


Once I had the adaptor I needed to get an s-video cable and a stereo cable to plug into the headphone jack on my Mini and into the RCA audio inputs on my TV.


My Mini came with Front Row and an apple remote so the software was all ready on the computer. I did have to download a few applications to make life a little easier. Just a quick note about the apple remote - if you hold down the play/pause button for 5 or 6 seconds, it will put your mac to sleep. It immediately wakes up if you press it again. It pauses your video exactly where you are, and resumes from there as well.


Perian. This will allow quick time to play many more video codec formats. So I won't have any issues playing most downloaded video.


Flip4mac. This is a WMV quicktime component that allows it to play WMV file format. So I can play windows formated video.


Now that I can use Front Row on my TV, and my apple remote to control things from the couch, I need to figure out how to get enough content on this computer. My Mini came with an 80 gig internal drive - which is really to small for a media centre. I needed more room. I decided to attach an external USB drive to the mini to allow for holding all kinds of video. I had to create an alias of the external drive in my Movies folder. It's as easy as right-clicking and dragging and dropping to make that happen.


I fired up Front Row and noticed something was not quite right. All my video, including TV shows all display in the Movies section of Front Row, and not the TV Show section. After some investigation I discovered that iTunes must be used to set the video kind to TV show. This was a problem because most of the TV shows I have are AVI, and DivX files. I didn't want to have to transcode and add all these shows to iTunes. At this point I discovered an application called Movie2iTune which will create links in iTunes to all your tv shows that can be sorted and set to TV shows, thus solving the problem. The software is automated, so all I had to do was select all my TV shows, and drag them over the icon for Movie2iTune. It adds them to iTunes automatically! All I had to do then was select them from the Movies section of iTunes, and change the video kind to TV Show.


The next thing I setup was screen sharing on the Mini so that I can remote into it to create files and move things around. I just had to turn it on from the Sharing preferences menu on the Mini. On my other mac I downloaded Chicken of the VNC. However there are times when I'm sitting in front of the TV and don't have my macBook Pro with me. As long as I have my iPod Touch with me, I can still use the Mini as a computer, even though I don't have a mouse and keyboard attached. I found an app for my iPod called Mobile Air Mouse. This app allows my iPod to act as a track pad and a keyboard.


I've been using my Mac Mini as a media centre for a few days now. I've setup file sharing of the Mini's movies folder and can move over any new video files from any computer on my home network. It is working perfectly, and I have made my way through about twenty episodes of Seinfeld so far. I'm still going to look for some way to more automate ripping DVD's. Currently I've been using Handbreak, but I'd love to just have to pop in a DVD and have it rip all by itself.


Related Links


Movie2iTune


Apple DVI to Video Adapter


Geexbox


D-Link DSM-320


Tversity


Perian


Flip4mac


Mobile Air Mouse


Sunday, August 23, 2009

My New Toy! - 13" MacBook Pro

This week I want to share with you my experience with my newest toy, although I really do hesitate calling it a toy. It's an AMAZING piece of technology. It's my new MacBook Pro 13 inch, and this little computer is blowing my mind!

I opted for the 2.26GHz base model, but I did splurge on the Ram and Hard drive. I didn't think that it was worth the $300 for the extra 300MHz or so of processor power. I upped the 2 gigs of standard Ram to 4 gigs. I looked at the 8 gig option for about half a second. It was an extra $1100 to get 8 gigs! I'm sorry, but that it just CRAZY! Is anyone really getting the 8 gig option? I heard that they actually grind up pixies to make the 8 gig ram chips. I also opted for the 500 gig hard drive so that I would have no shortage of storage space.

The unibody construction truly is a nice feature. This laptop feels very solid, and the all aluminum body really does seem to help keep it running cooler.

Multi-touch track pads ARE the future. I've been using it for a few days and I already don't know how to live without it. I'm sure we're going to see many other laptops showing up with this neat trick soon.

The display screen is very clear and bright. I was looking for something bigger than a netbook and smaller than my giant 17 inch dell, which was too heavy to lug around on a regular bases. 13 inches seems to be the sweet spot for me, and what I was looking for.

The biggest surprise for me with this particular laptop is the keyboard. It uses the standard apple chick-let keys, but the feel of them is wonderful. They have the perfect tactile feel and require a perfect amount of force when typing. It was something that hadn't even come to mind when looking at any computer before. As soon as I started typing, I could feel that these keys are perfect!

As anyone who knows me knows, I'm huge into the computer eye-candy, and this Mac does not disappoint. It looks stunning, both the computer and the OS. I'm one very pleased apple owner.

With this purchase, I can see that my transformation is now complete. I am a full fledged Mac user and moving up quickly to a Mac fanboy. I'm already looking forward to the next apple keynote like a child waits for christmas morning. My poor wife is caught in the middle and I'm sure is tired of hearing me lusting after the newest apple offering. Sometimes I wonder if she only stays with me for the free tech support. :)

Next week I'm planning to discuss how I set my Mac Mini up as a media centre computer for my TV... stay tuned (Pun totally intended there :)

Sunday, August 16, 2009

Antique Radio Jukebox – Part 2

Today I want to share with you some of the work I have been doing on my antique radio cabinet. When I last told you about this project I was thinking that I would try to restore the cabinet its original condition. I was also planning to use it as a jukebox. Complete with an installed computer and some sort of display that would allow me to browse and select music to play.

Since then, I have made a few changes to my original plans, and I want to share with you what I have done so far. I am very pleased with my progress, and with the direction that I have taken with this project.

Instead of building a jukebox into this cabinet, I have instead opted to refinish the cabinet in a more modern stylish design. I am in the process of installing an amplified speaker system. This involves a little soldering to tap into the existing controls on the sound system so that I can use my own volume, bass, and on/off controls.

I am planning to use this cabinet as an iPod dock. I will sit my existing iPod dock on top of the cabinet and plug in headphone and USB power cords. I had thought for a brief time that I would mount the actual iPod dock into the top of this antique cabinet and figure out a way to still have the remote work. In the end I decided that I might not always have an iPod. Ten or twenty years from now, the iPod dock will probably be useless. The way Apple abandons its products, I better not count on them to still be supporting this product for years to come.

As you can see from the pictures, I have really transformed this cabinet into something that looks good with an iPod connected to it. I can just plug in my iPod and turn on the cabinet and I’m good to go. It sure beats trying to wedge a computer with iTunes into the cabinet and figuring out some kind of GUI that would not look too out of place.

I will say that it was an EXTREMELY difficult decision to paint over the detailed wood on this project. I had not purchased this cabinet with the intent to restore it. My plan was to find something to build a jukebox out of. This particular cabinet really didn’t fit my needs for building a jukebox. For $20, it was too good a deal to not purchase. In the end, I feel good about how things turned out so far. Once I finish the internals, I'll update my blog.

I’ll start my search again for something more “jukebox” friendly for that project.

Click here for video of my dock in action. http://www.youtube.com/watch?v=ZkeSQiHr3dA


Friday, August 7, 2009

Projects from the Past - Building R2D2

Today I want to tell you about a project that I started working on about 6 years ago, but never finished. This is one of those huge projects you start when you’re un-employed and/or single, or in my case, have a very understanding wife.

At the time I stumbled upon the R2 Builders club. This was a yahoo group of R2D2 builders from around the globe. It is an amazing resource for anyone thinking about building this be-loved ‘droid.

As a kid born in the 70’s, I of course LOVED Star Wars. I had the action figures and model space ships. But what I always wanted was a life sized R2D2. It was about 6 years ago that I decided to build one.

Time went on, and I got busy, and R2 turned into one of those projects that just kind of gets put away and never finished. I had made some decent progress at the time, but it really is a huge endeavor to build a ‘droid, as you can probably guess.

The best way to tackle a project of this scale was to break it up into smaller parts. In R2’s case; The dome, the body, the two outer legs, and the third, retractable leg.

The Dome
This was a challenging aspect of this project. I needed to find an 18-inch diameter dome. I thought about all kinds of methods to make one, or re-purpose something else. I thought about paper-mache, but it wouldn’t be strong enough. I though about finding a big enough bowl or flower planter, but had no luck finding anything that would fit my needs. I looked through all kinds of cooking supply stores, second hand stores, and hardware stores, but no luck. It seemed like I was never going to find a dome for this project, and as I looked, I began working on the body and two outer legs.

Finally one day it occurred to me as I was walking down the street - a street light! I’ve seen them with plastic sphere's. I’m sure one would have to be 18-inches. I called a supply store and they told me they did have them, but it was $100. Not an outrages price, but still kind of up there. In the end I did get one and had the pleasure of cutting it into two halves.

At this point the dome is etched and primed. I still haven’t cut out the few panels I wanted to have open to reveal little R2 goodies, like a para-scope and a little radar scanner.

The Body
Of all the materials that I could use to construct the body, I decided on using a wood frame. I choose wood for a few reasons but mostly because it was cheap, and easy to work with.

At this point I have constructed the frame and the leg collars. The frame has been primed but not painted.

The Outer Legs
The legs are a project in them-selves. At the time I only had a jig saw and my cuts were not as perfect as I would have liked, so I used plaster to smooth out the edges. This was not a great choice due to the fragile nature of plaster. And if R2 was going to be moving around it may bump loose or chip. There is also quite a bit of detail in the legs that lead to all kinds of carving and chiseling to get just right. The legs also need to manage bending the feet during a two leg to three leg stance and back. So I needed to leave them hollow to allow for an inner rod to run through the length of the leg from the shoulder to the foot.

Where is this project now?
The reason I’m telling you about my R2D2 project is that I intend to start working on my R2 again! I did keep everything and have dug it all out of storage. I even found my plans. So I will be updating my blog with my status as I move forward.

My goal is to build a full-scale model of R2D2. The dome will spin; have working lights, and at least one opening panel that something will pop out of. (Haven’t decided what yet.) I would like to have some body panels open as well, for access to internal ports. I am also going to try and have it transition from two to three leg mode and back. All this will be controlled from an onboard computer. So basically I’m building a working R2D2.

This project will take me some time, however I am already well on my way, and I will keep you updated on my progress.

Monday, August 3, 2009

Acer Aspire One 751h 1366 x 768 resolution fix for Ubuntu

It took some time, and there were a few false leads, but I was able to finally get the correct resolution in my AAO while using Ubuntu.

These instructions come from http://www.aspireoneuser.com
Thanks to Allanon

Step 1: Update your system

sudo apt-get update

Step 2: Install the Authentication key for the software provider

sudo apt-key adv --keyserver keyserver.ubuntu.com –recv-keys C6598A30


Step 3: Add the following sources to your software repositories

deb http://ppa.launchpad.net/ubuntu-mobile/ppa/ubuntu jaunty main
deb-src http://ppa.launchpad.net/ubuntu-mobile/ppa/ubuntu jaunty main

Note: These can be added to the /etc/apt/source.list file or through Synaptic

Step 4: Update your system with the new software

sudo apt-get update

Step 5: Installing the driver

sudo apt-get install xserver-xorg-video-psb
sudo apt-get install dkms
sudo apt-get install psb-kernel-source

Reboot

Note: If you install a new kernel, run the following in the terminal after the update

sudo dkms build -m psb-kernel-source -v 4.41.1
sudo dkms install -m psb-kernel-source -v 4.41.1


To automate this step enter the following in the terminal

sudo gedit /etc/dkms/dkms.conf

Type in the following and save the file

AUTOINSTALL=YES

Also note: Suspend does not appear to be working on my system. The system wakes up, but there is no video on the display... Another problem to fix...

I'll keep you posted.

My new Aspire One Netbook - AO751h

Today I want to talk about my newest toy. I just picked up the new Aspire One netbook last Saturday. I decided that I was tired of squinting at the 8.9-inch screen of my old AAO. This is the 11.6-inch, AO751h model. My first impression is that I really like the looks and size of this model. 11.6-inches is a great compromise. I don't have to squint, and It's still small enough to be ultra-portable. The keys are 100% normal size, which means I don't feel like a giant trying to type in a URL or an email.

Once I turned it on, there was a huge problem right away. It took almost 2 hours for it to startup for the first time. It seems that Acer hadn't installed the drive image! The image had to be loaded onto the secondary partition via the primary restore partition. You'd think Acer would have had the time to do this before sending this thing out the door. I mean it just helps with first impressions. This Netbook comes with Vista Home Basic. Anyone who knows me knows, I HATE Vista! It's slow and clunky and the "Click and wait" feature is unbearable. I thought I would at least boot up this system, just to see how well it worked.

Windows 7

I can say that I did wait until it was finally finished loading before I powered it off (by holding the down power button, as if to give me the great feeling of satisfaction of actually killing the OS - Did I mention that I HATE Vista???) I immediately installed Windows 7, or as I like to call it "The Apology". My experience was not terrific. It seems that the video chip (Intel GMA500) is not capable at this point of supporting the Aero feature of Windows 7 without bringing the system to a crawl. Aero makes Windows 7 looks so nice! And I love the eye candy. So after fiddling with the driver settings for a while I decided that I would instead install another operating system. Windows 7 would have to wait until it had a decent driver.

OSX86

My next OS to try was OS X. Without any investigation, I just popped in my iDeneb 10.5.6 disk into my external drive and fired it up. It didn’t get too far into booting before it froze up. It seems that NONE of the hardware is supported in OS X. So this netbook will not be a Mac clone either.

Windows XP

XP has yet to disappoint me. It has been around so long now that it basically always works. I had XP installed and updated without any issue. All the drivers are available via the Acer website, so it’s a no-brainer install. This netbook comes with 2 gigs of Ram and a 250 gig hard drive. So XP is very happy on this system. The AO751h uses the Z520 processor clocked at 1.33GHz. It’s not a POWER machine by any means. But it performs totally fine for a netbook. I did find out that I can over-clock the processor via a software utility. If/when I play with that feature, I’ll let you know.

Ubuntu

I have just installed Ubuntu 9.04 on my netbook via the Wubi installer. I haven’t had too much time to play with it yet, but I can see that the GMA 500 is not setup correctly. The video looks 1024x768 instead of 1366x768. I’ll have to fix that.

A quick note; everything else looks like it was detected and is working. Both Ethernet and wifi work right out of the box. Also sound works fine too.

I’ll update when I have time to go through everything completely.

Wednesday, June 24, 2009

Remembering where I started

Today I want to go down memory lane a little bit. This week there is no project, but instead a look back to a piece of my early geek-hood. This goes back to the very early days of my computer use. Back to the beginning of home computers.

For most people my age, this goes back to the Commodore 64, and the Vic 20 computer. For me, it was the Atari 800XL. I had saved up a hundred dollars and wanted to buy my first computer, having only ever seen them in my grade eight class. We used it to play a text-based game called Lemonade, the goal of which was to figure out the correct blend of water, sugar and lemons, and set a price per cup that would keep people buying your lemony goodness. Obviously this game was AWESOME!

I took my hundred dollars and went to Toys-R-Us to purchase my first 8-bit computer. My choice was the Atari 800XL. It was ninety nine dollars, and it was soon in my hands as I walked home. I bought it on a Friday. I remember this, because the next day my family was taking a trip to Canada's Wonderland. For those unfamiliar, it's an amusement park near Toronto, Canada. It's full of roller-coasters, and various other rides and goodies. I remember this so well, because as much as I LOVED going to Wonderland when I was a kid, after having plugged in my new computer into my 12 inch black and white TV for only a few short hours, I had decided that I wanted to stay home alone that weekend to sit and play with my new toy!

This was huge! I could not stop playing with this new computer. The crazy thing is, that there was almost nothing to it. It was 48K, and a built in BASIC language interpreter, and that's all. No storage of any kind, no games, no software, just the word READY with a little boxy cursor sitting under the R.

The computer was turned on, and was READY for whatever I wanted to do next. Which meant learning to program in BASIC.

Obligatory first code

READY
10 PRINT "HELLO WORLD ";
20 GOTO 10
RUN

HELLO WORLD HELLO WORLD HELLO WORLD HELLO WORLD

I spend the next year or so learning how to create my own software, which I had to save by writing it down by hand! If I turned off the computer I had to re-type my code again. This got old - fast.

My next purchase was a cassette tape drive. It was used, and only thirty dollars. Now I could save my code to blank cassette tapes. These were very exciting times for me.

As time ticked by, I slowly purchased every accessory I could find, a printer, a modem, a 5 1/4" floppy drive. There were hard drives available in those days, but it was crazy expensive for a 20 MB drive and I just didn't have the money. But I dreamed of one day owning it. I mean, with 20 MB, I could save every application I had, and would have plenty of room for anything else I could download at 300 baud.

So what has prompted me to cruse down memory lane you might be asking. Well, a while back I was walking through a second hand store and came across a little piece of my past. It was the single little device that opened the whole world to me, one BBS at a time. It was the same make an model of my very first Modem. It even had the manual with it! This was the 300 Baud Pocket Modem as distributed by BOT Engineering. The same modem that I purchased for about a hundred dollars, back in the day, before I even knew who to call. I asked the salesman at the computer store for a number to call with my new modem. Luckily he had one, and that began my very slow journey into cyberspace.

My very first chat online was between me and the SYSOP of a local BBS (Bulletin Board System). I was so excited that I was having a conversation with another human over the modem, that I ran to get my entire family to come and see this marvel of technology! We were all very impressed, and I knew that using computers was how I wanted to spend the rest of my life. It sounds sorta silly now, but back in those days, this was all amazing technology, that regular people had not really seen or played with before.

With that modem I became a hacker and didn't even know it. I, like many, if not all of you, had just recently watched "War Games". That movie gave me the idea that I could write a program that could call every phone number in my city, and look for modems to answer - AKA War-dialing. I had no idea this was what I was doing. To me I was just looking for other computers to call.

This was actually pretty easy code to write. The manual for my modem had some example code which demonstrated how to write software to make a modem call. I remember that the biggest concept that I had to wrap my head around was that this was a pulse dialing modem and that I could not have it tone dial. I had to pulse or quickly hang-up and pick-up the phone in quick succession to dial a number. Once I realized this, I just had to create some FOR loops, and have the code keep track of which numbers answered with a modem tone.

This code worked, and thank God that back then, no one had call display!

I bought that modem from the second hand store and it now sits on my bookshelf as a reminder of both my youth, and those early, innocent days of computers. And... no Internet!

Friday, June 19, 2009

Hard Drive Wall Art Project– Part 1

This week I want to share another computer art project that I just started working on. I don’t know what it is with me, and old computer parts, but I love gathering up old computer junk, and hanging it on my wall! It’s something I may have to investigate and possibly correct before I run out of empty wall space, which is another “thing” with me.

This time I was thinking about what to do with the 20 or so hard drives that I have been collecting over the years. Some of these are smaller than 350 MB! Yes I typed that in correct – MB as in Mega Bytes, as in 486 computer hard drives. That’s how long I’ve had these things around.

So the idea is that, wouldn’t it be neat to have them all lined up and hanging on my ever-geekier walls. I mean, I already have a collage of computer motherboards hanging on the wall, why not display the hard drives in the same way?

I think deep down there is a part of me that truly believes that if I get enough of these computers hanging on my wall that it will somehow have super computer powers of computation, the likes of which only the greatest IBM mainframes could even compare. But really, I just love how amazing this old technology looks. It’s so precision made, and crafted as perfectly and shiny as it could be made.

Getting started

The first step for this project is to gather up all these hard drives that have been hiding around the house. I know there are a lot of really old ones in the basement storage room. I know because I’ve been hording them, and keeping them on my – turn into computer art someday – storage shelf. This is where old shinny stuff goes when I’m done looking at it, but don’t want to throw it away.

After finding the correct screwdriver’s I started removing the hermetically sealed covers. It’s funny how at some point in the past everyone decided to stop using Philip head screws, and start using a Torx screws on hard drives. This change seems to have happened when hard drive sizes reached about 400 Mega Bytes in size and up.

I have to say; twenty-one hard drives are very heavy! I’m not sure how to even attach them together yet, let alone hang them on my wall without it crashing to the floor taking chunks of my drywall with it. With my computer wall art projects, I tend to need to hang these things only after having found beams to drive 4 –inch bolts into.

I’m going to begin removing as much weight as I can before I start to construct the final project. I am also still playing with a pleasant configuration and layout. At this point I have my raw material, but it’s not really started yet. I need to find my inspiration for this project.

To be continued…

Thursday, June 4, 2009

Building a Hackintosh - Part 2

After last weeks blog, I started to investigate how far things have come in the OSX86 world. It seems that there is a new favorite "distribution" of OSX86 available that makes the instillation of OS X on my particular Netbook even easier! I decided to try it out. I had just recently installed Windows 7 RC build 7100 on my Aspire One, and it was working flawlessly, but this was too good to pass up.

iDeneb v1.4 is OS X 10.5.6, and has a check box in the install specifically for the Aspire One. After downloading and burning the ISO image, I connected up my USB external DVD drive and fired it up.

The install only took about 15 or so minutes, and consisted of continually clicking Next, Next, Next. I ran the Disk Utility to erase my existing drive, and before the final click to start the Install, I hit Customize. This is an import step, and one I suspect is usually skipped right by without ever being noticed by many an eager Haxor. :) In my case, I simply left every setting as it was and checked the Acer Aspire One check box. Not difficult in the least.

Again I was able to find the post install instructions on the Aspire One User site. I was directed to hit the Enter key at bootup, and type "-x" without the quotes of course. This forces OS X to boot into safe mode. Once it boots up, I simply followed the initial setup screens. I entered in all my personal information, selected my wireless network, and even took a snapshot from my built in web cam.

The next step was needed in order to correct the video resolution which seemed to only offer 800x600 on my native 1024x600 LCD screen. As well as allow me to not have to log in through safe mode.
I went to Diablo's iDeneb v1.4 site, which is in Spanish, and was finally able to click on something that would download the much needed file. Fro that download I installed two small applications, "Donotsleep" and "GMA950". After a reboot, things seemed much better.

That is pretty much it for the install. Everything except sleep works perfectly. I've installed a variety of applications, and everything seems to run fine. I have to say, this Aspire One makes a very nice little Macbook!

For those interested, on my 1 gig system, it takes just under a minute to boot up, and only 13 seconds to shutdown. Using windows, I remember suspend sometimes took almost that long at times!

I can totally live with no suspend at this point.... till the next new OS comes out :)

Related Links

Aspire One Users
http://www.aspireoneuser.com

Diablo's iDeneb v1.4 installer
http://webmaster-mexico.com/ideneb-v1_4-10_5_6-instalador

iDeneb v1.4
I'll leave that one to you ;)

Saturday, May 30, 2009

Building a Hackintosh

This week a wanted to share a project that I started playing with a few months ago, and am planning on re-visiting soon – Installing OS X on my Acer Aspire One Netbook. I got this little Netbook almost a year ago now, and have enjoyed it ever since. I Love it, and I now carry this little marvel around with me everywhere I go. It's great for work too. Now I can check email or remote into my server from anywhere without having to carry around a, now giant, 15 inch, six pound laptop.

This Netbook came preloaded with Windows XP Home... BORING! It lasted almost week. I soon had XP Pro and the latest release of Ubuntu dual booting. I was surprised how fast this little laptop ran. It's truly amazing.

I have seen a lot about getting OS X installed on Netbooks on the Internet lately. It seems that they actually run really well. I thought this might be an awesome project to try. Also, there's one thing that you need to know about me. I have a HUGE crush on OS X. I think it's beautiful, and have made every computer I use look as much like OS X as I can. (Mac4Lin on Linux, Flyakiteosx for Windows)

So as usual, I consulted Google and soon found www.aspireoneuser.com. This site has all kinds of information on my particular brand of Netbook, and also has forums and guides containing instructions on installing this forbidden OS on to non-apple hardware.

What doesn't work

There were a few issues, and this was not a perfect install. Firstly, the wireless networking was not going to work. Many have tried, and all have failed to find a way to get the native (Atheros) wifi card to work with OS X. If I wanted to have wifi working, I was going to have to replace it with an OS X friendly one. Luckily finding a wifi card that would work was easy. Apparently the Dell DW 1390 and 1490 cards work without any additional drivers or setup. All I had to do was remove the old card and install the new one.

Secondly, there is no working suspend functionality for this hackintosh. Suspending this computer will drop the OS into a grey screen of death, requiring a reboot and a permission repair, just to keep things running smoothly.

Also, at that time, you could not run a native Apple update without killing the OS and leaving you with a Kernel Panic.

At this point, I can live without suspend and apple updates if everything else still worked. So the project was still a go. I just needed to order a new wifi card and install OS X.

Prepping for Surgery

Now, normally I would have no issue removing and installing a new network card, however, I've always been afraid to muck around in a laptop. I could easily swap out RAM or a Hard Drive, but beyond that was more than I have been willing to do, until now. My fear is not really in the taking apart, per-say, but in the ART of reassembly. These systems are all proprietary and the screws are CRAZY tiny! To make matters worse, this was a Netbook. It weighs in at about two pounds and is half the size of a regular laptop.

I love the Internet. I say this almost everyday, and it's still true. I found several YouTube videos detailing exactly how to open up and replace the existing wifi card.

I was also able to find used Dell DW 1390 card on Ebay for $12. In a week it arrived and I was sitting, prepped for surgery, next to my half gutted Netbook.

It was actually quite painless and in about 30 minutes, it was installed and working in XP.

Now, I had also ordered a one gig so-dimm to upgrade the RAM in my Netbook to 1.5 gigs. I thought that I would do this while I had my Aspire One opened up. However the process required to upgrade the RAM was far more involved than the wifi surgery had been.

Even with How-To videos, I didn't feel comfortable taking the entire computer apart. Really, who designs a RAM slot under the motherboard and requires you to remove the keyboard, track-pad, outer plastic casing, heat-shield, display cabling, hard drive, Wifi Card, a daughter-board, and the freaking motherboard just to access the RAM slot!!! CRAZY!!!

Installing OS X

Once the surgery was done, I was ready to start the install. I have a Mac Mini, and I do have a copy of OS X Leopard that I would love to just install straight onto my Netbook. But Apple just won't let that happen. So I had to resort to “Finding” a copy that had been patched to work on a regular PC.

I choose the iAtkos distribution of OS X to install, mostly because there was a list of after install tweaks listed on the Aspire One User Forum for this particular install.

The install went smoothly and there were no issues. I went through the list of tweaks and I could boot and run my new OS X system perfectly. Even the Web-cam worked right out of the box. I have to admit that not being able to just close up my Netbook and have it suspend was more of a nuisance than I thought it would be.

In Conclusion

I kept OS X installed for about a month. I usually change the OS after a month or so on this Netbook. There are so many new and exciting OS flavors to try that I can't just pick one and leave it. I can't wait to tell you how well Windows 7 works! But that's for another time.

Related Links

Aspire One User
www.aspireoneuser.com

Aspire One Wiki
http://en.wikipedia.org/wiki/Acer_Aspire_One

iAtkos Site
http://iatkos.wikidot.com/

Sunday, May 24, 2009

Antique Radio Jukebox – Part 1

This week I wanted to talk about a new project that I am in the early stages of working on. After I completed my arcade machine I found that I really enjoyed using it as a jukebox. The software was very easy to use and really gave a nice jukebox experience. It occurred to me that It would not be much more difficult to build an actual jukebox than it was to build an arcade machine.

While researching jukeboxes and old radio cabinets, I found that I was really drawn to the older, classic looking designs. The older cabinets from the 30's and 40's had so much style and design built into them.

The idea is to have my jukebox look just like one of these old jukeboxes, but inside I would of course have a computer and about 20 thousand available songs!

I thought that I could probably find an antique jukebox or radio cabinet for this project. However I did not want to destroy a classic antique, so I began to look for an old cabinet that was beyond restoration.

I managed to find an old radio cabinet that would work perfectly for this project. It is a Philco model 37-610. This radio cabinet was built in 1937! This was a 5 tube radio that did not work at all. It was missing some knobs and the tubes were dead. I managed to buy it from a collector who let me have it for $20!

So this is basically where I am with this project. I am going to try and restore the cabinet itself as best I can. This will take quite a bit of work as even the laminate is pealing off in a few places. I am planning to modify the look of it as well. At first I felt like I should not do anything too drastic to change it's appearance. It's kind of scary to start hacking away at a 72 year old piece of history. But I soon realized that I bought in in such rough shape, I shouldn't feel too bad about changing it. (I'm still fighting with this one, but I've made up my mind).

I still need to actually figure out how this radio will work as a jukebox. It's easy enough to fit a computer and a sound system in the cabinet, but I am not sure how to set up the user interface yet. Some ideas right now include having an LCD screen rise up from the top or back. I have also been thinking about using a 10” touch screen laying flat on the top surface.

The plan right now is to have it look as close as possible to original, but work as a modern jukebox.

I'll keep you updated on my progress as I move forward on this project.

Related Links

Philco Radio Gallery
http://www.philcoradio.com/gallery/1937a.htm

Sunday, May 17, 2009

Arcade Cabinet - MAME Cab

This week I wanted to share one of the biggest and most challenging projects I have completed to date. I'm not really sure when or how this project actually formed in my mind. It just sort of popped in my head one day that it would be really cool to have my very own arcade machine to play with any time I wanted.

I was born in the 70's, so that means that I spent a good part of my childhood at the local arcade. I used to pour quarters into the Galaga machine, trying to see just how many little alien ships I could blast away. Unfortunately I never had enough quarters to get very far.

So, as it seems that I can never quite satisfy my feelings of nostalgia, I set about looking for any and all information I could find about building an arcade machine. Around this same time I had a conversation with a friend about how he would love to have his own arcade machine as well. It seems that for him, Centipede was the game that he had spent his youth trying to beat. I told him that I was thinking about building an arcade machine and that it would probably not be too much harder to build two machines instead of just one. This would also serve as a strong motivating force to get this project started and completed, as I now had one paying customer.

As it turned out, I was only able to build one machine, due to space and time constraints. So I built a complete arcade cabinet for my friend to satisfy his Centipede cravings. In the end I learned a lot from building that first cabinet. The most important thing was that I would NEVER build in a trackball again. The precision needed to build it into the control board was very difficult, and I spent way too much time trying to get it perfect.

A few months down the road I got married and moved into a bigger house. I now had two important things – more room to build my arcade machines, and a new wife who was still glowing from having just been married, and who was not yet used to putting the kibosh on my larger - aka more expensive -projects.

So I started again, this time, with experience under my belt, and another friend who wanted his own arcade machine as well. Thanks for the extra motivation Bry!

Researching MAME Cabinets

A quick search of Google led me to a huge community of people who were planning and building their own arcade machines. MAME was the software that would allow me to run all the arcade classics as well as some of the newer games.

I also found the perfect front-end software that I could use to interface with the MAME software – Ultrastyle. This software allows me to display a spinning cube with screen shots that I could scroll through to find whatever game my heart desired. I just needed some game Roms. This was easy, Rom World had 100s available to download. Now all I had to do was configure all the software and I could start reliving my childhood and the best part – NO QUARTERS!!!

Planning the cabinet build

At this point I could play these arcade classics on my computer and it looked great, but I wanted a truer experience. I wanted to stand in front of a full size arcade machine. After looking around at some of the cabinets that others had made, I decided to model my machine on the traditional Defender cabinet.

I drew up my plans and headed for Home Depot. Ahhh, my home away from home. I could spend an entire day just walking around Home Depot, looking at tools and home renovation supplies, and of course the smell of all that wood. It just smells so good there. Anyway, I picked up a few 4 x 8 foot sheets of ¾ inch particle board. This would allow me to build the bulk of the cabinet. I also picked up some 2 x 3's and 2 x 2's. These would serve as the frame for my cabinet. There were also a variety of assorted parts and wood that went into building these cabinets, far too many to go into detail here. Needless to say I made many trips to Home Depot before I finished.

Building my Arcade Cabinet

It took about five months to build the first cabinet. The next two I built together, and only took about three months to complete . I ordered T-Molding for all the edges. This really gives the cabinets the true arcade look and feel. I ordered the buttons, joysticks and a track ball from X-Arcade. They do sell an already completed control board, but I opted to build my own.

The thing with this kind of project is that you are never really done. There are always upgrades and little things that you can do to make it even better. I finished the majority of this project about two years ago, but I still have some plans about what to add to it next.

I've added a “Show-Off” mode to my cabinet. Two 10 inch sticks of green automotive neon lighting that are powered directly from the computers power supply. They light up the chrome diamond plate kick plate and the back wall with the flip of a switch located on the top of the cabinet. I also have plans to add a couple USB ports to the front of the cabinet so I can plug in a Guitar Hero guitar or a DDR mat.


Jukebox mode

I've also decided to use my arcade machine as a jukebox as well. It seems like a common thing that a lot of MAME cabinet makers do, and there is a lot of software to pull off this neat trick. I added a wireless nic card and shared the music folder that the jukebox software accesses. Now I can wirelessly add or change the music available to the software (WinCab). Very cool bonus project!


Related Links

Galaga Wiki
http://en.wikipedia.org/wiki/Galaga

Centipede Wiki
http://en.wikipedia.org/wiki/Centipede_(video_game)

UltraStyle
http://ultrastyle.mameworld.info/

ROM World
http://www.rom-world.com/dl.php?name=MAME

Defender Wiki
http://en.wikipedia.org/wiki/Defender_(arcade_game)

T-Molding
http://www.t-molding.com/store/home.php

X-Arcade
http://www.xgaming.com/

DW Jukebox
http://dwjukebox.com/

MAME World
http://mameworld.info/

Saturday, May 9, 2009

Motherboard Wall Art Project

Today I want to share with you a tech-art project that I put together last year. The idea came to me as I was checking the time on a tech-art project from years ago. Back then I thought it would be a neat idea to make a clock from an old printed circuit board that I had removed from a dot-matrix printer.

With that project, I first removed all the larger capacitors and anything else that might get in the way of the clock hands. I then drilled a hole in the centre of the 8 x 10 inch board and mounted a standard clock motor through it. It turned out looking pretty nice, and I still have that clock hanging on my office wall at work.

For this new project, I was considering what to do with all the old computers that had been slowly filling up my basement. Years ago I had thought about building a Beowulf cluster from 486 PCs. This was at a time when P3s were common and Windows 98SE was the OS of choice. Needless to say, these old clunkers were pretty much useless now, and served little more than paper weights taking up space. My hopes of building a cheap super computer that would one day help me take over the world will have to wait.

The idea came to me that it would make an especially geeky wall hanging if I had some old motherboards mounted on a frame and hanging over my computer desk - as a kind of homage to days gone by. Most of these computer were salvaged from the trash, and from family members who were going to throw them out. A couple of these computers were actually my everyday computer at some point in time, so it would be nostalgic to be able to look up and see them hanging on the wall above me.

It took a little time, but I eventually removed all twelve motherboards from their cases. I also removed all the cards and the slot processors from the P2's. I decided to leave as much ram as I could. Anything that I couldn't use in other systems would stay.

I then build a frame from 1 x 2 inch pine and used a thin piece of plywood as a surface to mount the motherboards to. The wood frame would attach to the plywood and act as support to let me hang it up when done.

I then arranged the motherboards so they would fit as neatly as I could, and proceeded to drill through the original mounting holes in the motherboards right through the plywood. Now I could use small bolts to mount the boards to the plywood.

You can see from the finished photo that it takes up quite a bit of space up on the wall. It also is surprisingly heavy! I really had to be careful how I mounted it to the wall, so it would not fall and kill me, or worse my computer!

Now when I feel like a trip down memory lane, I can look up and see my old first generation Pentium 60 (The one with the floating point calculation error built in). I can also see my old PII-266. This is the computer that I learned how to over-clock on. I had it running at 333MHz.

Ahh, the good old days...

Sunday, May 3, 2009

Switching to Ubuntu – for good this time.

Today I made the switch, again! I have been using windows XP pro for more than 5 years, and I can say with confidence, that I know how to use it. I know where all the buttons and settings are, I even know how to play with my boot.ini file to manipulate my dual boot settings. I consider myself a windows user, that is, until today.

I have just finished tweaking the last setting on my almost 3 year old Dell Inspiron 9400 laptop. When I got this laptop, it came supplied with Microsoft's Windows Media Center edition pre-installed. It also came with about a hundred other applications that Dell decided I needed to have. Most of it was junk, and only served to frustrate me as I tried to navigate through the myriad of clicks and pop-up windows.

At that time I heard of a new Linux distribution that everyone was talking about - Ubuntu, Linux for Human Beings. The latest release then was Dapper Drake 6.06 and I had just received my FREE CD from Canonical, the commercial sponsor for this distro. Ubuntu was not a brand new Linux distribution at that time, it had been around for a while and was now starting to really gain a foot-hold with adventurous window users like myself.

For the most part, everything went fine. I went through the install and nuked windows while I was at it. It's not hard to re-install an OS and I was not really happy with my pre-install anyway, so it was worth the risk. I played with dapper for about a week. During that time I had to drop to the command line more than a few times, which was actually painless. But in the end I just didn't get what I wanted out of Ubuntu. I switched back to Windows.

With the next release of Ubuntu, Edgy Eft, I gave it another try. This time, it didn't go so well. No wireless, and my video card was not working at all. I have an ATI x1400 video card, and at first it would only boot to the command line. I played with the settings, and scrolled through the forums to solve these problems. But I still wasn't happy, and I switched back to Windows again.

This back and forth has gone on since then. With every new release of Ubuntu, comes another go-at-it. But today is finally the day I switch for good!

I just installed Ubuntu 9.04 Jaunty Jackalope, and it is amazing! There were still a few issues, but a quick Google fixed everything. This is how I did it...

First things first, my hardware:

Dell Inspiron 9400 (Core Duo T2600 processor 2.16GHz) Centrino
1.5GB RAM
Intel 945PM Motherboard chipset
100GB hard drive
SD Card Reader
DVD DL writer
6 x USB2.0
Firewire,
RJ45 (LAN) 10/100
RJ11 (modem) 56K data/fax
VGA, DVI, S-Video output
Intel Pro/Wireless 3945ABG Wifi
17 inch TFT wide-screen display
ATI Radeon Mobility X1400
1920 x 1200 Max resolution

Installing Ubuntu

Download and boot from live Ubuntu 9.04 CD. Note: Ubuntu includes the Wubi installer, which actually lets you install Ubuntu from within your windows environment. I have used it in the past, and it works great. In this case, I have decided to get rid of windows all-together.

Get Ubuntu here: http://www.ubuntu.com/

Once the Ubuntu desktop is running, double click on the install icon. There are a series of screen that for the most part you can click through. You will want to pay attention to the partitioning screen. This is where you must decide how you want to split up your hard drive. I've heard that it is a good idea to setup a separate partition for the /home folder, that way if you re-install Ubuntu again later you won't loose any user files.

Losing the Brown and Orange

When the install is complete, you will be given the option to remove the CD and reboot. When the computer reboots, you will be looking at a fresh install of Ubuntu. Ya, I know, brown... yuck!

For some reason, Ubuntu's designers, some time ago, decided that brown was their colour. I don't know why they choose brown, which is arguably the most unexciting, plain, boring colour in the entire colour pallet, but they did.

Fortunately, if you are as un-enamored with the shades of brown and orange of Ubuntu's default Gnome (the default window manager) interface as I am, it is very easy to customize. The appearance of your GUI can be changed from the System → Preferences → Appearance menu. This is a good start, but for me I've found something better!

I have always loved the look and feel of Apple's OS X operating system. It just looks so pretty. For me, I'm all about the eye candy. I want my computer to look beautiful. And OS X looks simple stunning. While a windows user, I would employ an OS transformation package to make my boring XP desktop look like OS X. It was an application called “FlyaKiteOSX”. Strange name for an app, but it worked great! So I set out to find the same thing for my new brown Ubuntu system. After several Google searches, I found my answer.

Mac4Lin is a sourceforge project that let's you completely change the look of Gnome, to look like OS X. And with the addition of the Avant-Window-Navigator, and removing the lower panel, I have to say I am impressed with the look of this OS X clone.

Get Mac4Lin here: http://sourceforge.net/projects/mac4lin

Fixing Wifi problem

With this particular laptop I did have a problem getting the wireless to work correctly. The network manager did not display any wireless networks, and I was not sure that my network card was even detected. I ran the following command in terminal;

lspci -v | less

This displayed all the devices in my computer, including my wireless card. So I knew that Ubuntu knew it was there. After another Google search I found a suggestion to remove the existing Network manager and install a new one.

I ran the following commands in terminal.

sudo apt-get install wicd

This placed the Wicd App under Applications → Internet menu. From there I could see my wireless network and connect to it.
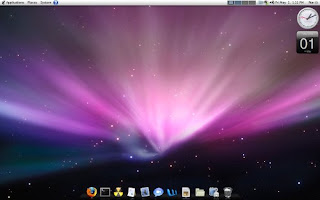
The finished product

You can see from my screen shot that Mac4Lin really does a nice job making the Gnome desktop look like OS X. It also change the minimize, maximize, and close buttons to the left side of open windows. I've turned on the extra visual effects as well. So I have wobbly windows. I've also setup an effect very much like OS X's expose by going into the Window Management --> Scale in the CompizConfig Settings Manager and making sure it was enabled. I set mine to trigger when my mouse hits the top right corner of my screen.

I'm very happy with my Linux system right now. It was easy to get everything setup and working, thanks to Google. If you have any questions, let me know.

Welcome to my Blog!

Welcome to my blog. I have spent many years working on projects, taking things apart, and generally hacking the heck out of anything I could get my hands on. I like to learn how things work, and see what else they can do.

I have decided to put this blog together to act as both a source for those looking to learn how to do something that I might have already done, and as inspiration for those thinking about doing something, but not sure how or what to do.

I hope you find it both educational and inspirational.